A RV wiring diagram is a must for anyone who is owning or planning to own an RV. A good RV wiring diagram will help you understand your RV electrical system and how it works.
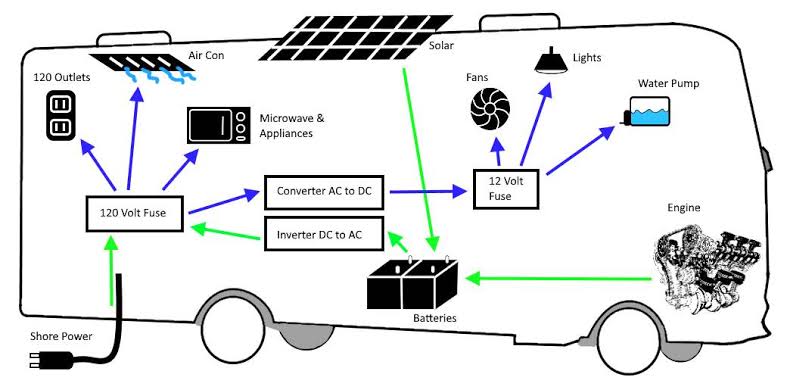
RV wiring diagram is a visual representation of the electrical system in a car. It is often used to identify and troubleshoot equipment and circuits. The diagram typically consists of an overall layout of the RV’s electrical system, with individual circuits highlighted in red, green, or blue.
In this article, we’ll be discussing the significance of RV wiring diagram when wiring RV
RV Wiring Diagram: What is A RV Wiring Diagram?
RV wiring diagrams are a crucial part of any RV owner’s notebook. They show the electrical connections between various pieces of equipment in your RV, and can also be used to troubleshoot issues.
A RV wiring diagram is also an excellent way to learn about the specific systems in your RV and what needs to be replaced or upgraded.
A well-illustrated RV wiring diagram can also save you time and money in the future when repairing or upgrading your RV.
Benefits of RV Wiring Diagram
A wiring diagram is a visual representation of the electrical connections in an RV. By understanding how these connections work, you can improve your RV’s performance and avoid costly repairs.
There are many benefits to having a wiring diagram for your RV. This can help you get a better understanding of what is going on in your vehicle and make easier repairs should something go wrong.
Here are just some of the benefits:
1. You can be sure that your RV is properly wired and that all of its components are working as they should. Without a wiring diagram, you may not be able to determine which wire goes to which component and might have to replace parts or entire circuits if something goes wrong.
2. You’ll be able to identify potential problems before they become emergencies. A good wiring diagram will show which outlets are connected to which cables, and where the power lines terminate. This information will help you figure out where to install receptacles and other electrical devices, and prevent Voltage Overload or power loss when your rig visits remote camping areas.
3. You’ll be able to troubleshoot electrical issues more easily. When you understand the layout of your RV’s circuits, you can locate points of failure much faster. You’ll also be able to determine whether the problem is with a circuit, or with a particular piece of equipment.
4. You can save money on repairs because you’ll know upfront what parts need replacing or are not working as they should.
5. You can use the wiring diagram to expand your RV’s electrical system if it needs it, without having to buy a new engine or other components.
6. You can start a project and get it finished in short order.
7. You won’t need to worry about finding the right tools or buying them at the right time because you’ll already have everything you need, just in case your RV needs repair.
How is RV Wired?: Step-by-step instructions
If you’re a camping or RV enthusiast, then you know that there are many different ways to wire your RV. By following these basic steps, you can wiring your RV in a way that is safe and efficient.
1. Start by finding the power outlets on your RV. Many RVs have two power outlets, but others may have only one outlet. If your RV has only one outlet, find a place to mount the power cord so that it isn’t visible from the outside of the RV.
2. Next, find the grounding wire for each of your main circuits. Each main circuit needs its own grounding wire; do not put this ground wire near any other wires in your RV.
3. Connect each of your circuits together using gender-neutral connectors (gutters). To do this, connect a grounding wire from the male connector to each of your main circuits.
4. Now connect the male ends of all power cords and ground wires together at the center of your RV.
5. Now you need to ground each of your circuits at the center of the RV. To do this, go to a place where you can see it “from the outside. ” Before you connect any wires, you need to “ground” the circuit by grounding a metal object such as a concrete block or piece of wood. This is called “cathode-ray proofing. “
6. Connect your wire to the female terminal of your power converter.
7. Now connect all of your wires together at the center of your RV.
8. You should have a circuit that is “cathode-ray proofed” and has been “grounded. ” Just remember to “clean” the RC8 and the ground rods before you touch anything else. If you do not have a vehicle that is “cathode-ray proofed” this will not work for you.
9. Before you turn your power back on, disconnect the wires from the neutral terminal of the RV.
10. After you turn the power back on, open all of your windows and shut off all of your lights. This will allow a “clean” power source to flow into the RV.
11. Turn on your “power” and follow the arrow (on your power converter) as you turn it on and off. This should also help to keep any water vapors out of the air.
12. If all of your lights turn on, you are ready to go!
Note: If the power is not working after turning on the power and following the arrow, replace any fuse that has blown. If you still do not have power, remove the fuse and check for any problems. If your RV has no power and a dead battery, check to see if you have a fuse blowing or anything going bad in the electrical system.
If they are both problems, you need to replace the entire electrical system. It is possible to have no power when you first turn on the power and follow the arrow, but this is not a good idea.
Tips for efficient RV Wiring
RV wiring can be a daunting task, but there are a few tips to help make it easier. RV wiring diagrams are essential for anyone who is wiring their RV. A good diagram will help you understand your RV’s electrical system and better plan your repairs.
Here are some tips to help you make a good RV wiring:
1. Make sure you have an RV electrical diagram. This will show you which wires go to which devices and connections.
2. Identify the receptacles and outlets in your RV. Make sure they’re in the correct location and that they’re accessible when you need to connect power or devices.
3. Connect all of your RV’s wires together with an electrical connector.
4. Know the RV’s power supply type. This includes both the generator and the outlet that feeds it.
5. Make sure all incoming and outgoing cables are properly terminated. This includes TV, audio, phone, inverter, and power cords.
6. Make sure the circuits are clearly marked with labels or numbers. This will help you identify which wires go to which part of the RV and where they branch off from each other.
7. Check for fuse boxes and breaker boxes throughout your RV. These devices can save you time when fixing electrical problems in your rig.
8. Check for any transformers, AC cords, and other non-electrical devices. They can cause electrical problems in your RV.
FAQs
What color is the ground wire on an RV?
The ground wire on an RV is usually a green color.
How does the electrical system work in an RV?
The electrical system in an RV works the same as any other home or office electrical system. You will need to have a power outlet and an RV plug. The RV plug is just like any other plug, it needs to be connected to an RV outlet.
The RV outlet will also have a power light that will say “On.” The next thing you’ll need to do is connect the power cord from the power outlet to your RV. Then, connect the RV plug to the power cord.
Is RV 30 amp 110 or 220?
There is no definitive answer to this question as it depends on the specific RV you are purchasing. However, most RV manufacturers recommend that you choose a RV 30 amp 110 outlet rather than a RV 220 outlet because of the higher wattage available on the 110 outlet.
Conclusion
RV wiring diagrams are a great way to get started when wiring an RV. They show you how the various components in your RV connect together, as well as where each wire goes. Wiring diagrams can also be very helpful in troubleshooting RV problems.