Light up your backyard and enjoy cool nights with friends around a cozy outdoor fireplace.
For all of you ready to take on the challenge, this DIY Outdoor Fireplace Guide is here to help make it a reality.
From researching local building codes & permits to selecting the materials for your project, our guide has everything you need to know about developing an effective outdoor fireplace design that fits any budget or landscape.
The fire feature possibilities are endless — whether creating an artisanal brick oven or a more modern metal unit – as are the memories you’ll have marinating around its warm flames in years ahead. Let’s get started on this exciting journey.
Importance of A DIY Outdoor Fireplace
Investing time and effort in building a DIY Outdoor Fireplace has numerous advantages beyond the obvious aesthetic appeal.
For starters, it offers a unique focal point in your garden or patio, creating a warm and inviting space that fosters socialization during gatherings.
This fireplace can be a venue for cooking, offering a rustic and flavorful alternative to conventional kitchen appliances.
Economically, a well-constructed outdoor fireplace can significantly enhance the value of your property, making it a wise long-term investment.
Moreover, the DIY aspect allows personal customization, ensuring your outdoor fireplace reflects your taste and style.
Lastly, particularly on cool nights, the fireplace provides a source of heat, extending the use of your outdoor space beyond the summer months.
What You Will Need to Build An Outdoor Fireplace
The essential tools and materials needed to build an outdoor fireplace include:
- Firebricks: These are special bricks that can withstand high temperatures and are perfect for the interior of your fireplace.
- Mortar: This is the adhesive that holds your bricks together. Make sure to choose the one that can handle high temperatures.
- Concrete Blocks: These will form the structure of your fireplace.
- Rebar: This metal rod provides structural support to your concrete blocks.
- Concrete Mix: You’ll need this to set your rebar and bricks.
- Fireplace grate: This is where you’ll place your logs for burning.
- Metal Lathe and Stucco or Stone veneer: These are for your fireplace’s exterior. Choose the one that suits your style and preference.
- Building Tools: Shovel, Levels, Trowels, and Wheelbarrow.
Remember, safety should be your primary concern, so don’t forget your protective gear: safety glasses, gloves, and a dust mask. Always follow safety guidelines while handling these tools and materials.
Essential Steps to A DIY Outdoor Fireplace

Step 1: Find a Location for the Fireplace
Choosing the right location for your outdoor fireplace is crucial for safety and enjoyment.
Look for a spot at least 10 feet away from your house, trees, and other potentially flammable structures.
Be mindful of the wind patterns in your area to avoid smoke blowing into your home or seating area. Additionally, consider the view and accessibility of your home.
The fireplace should enhance your outdoor landscape and be easily accessible for use and maintenance.
Always check with local zoning laws and regulations before deciding on a location. Once you’ve identified the perfect spot, mark the area.
Step 2: Clear the Area
Once you have marked your preferred location, the next step is to clear the area.
Remove debris, shrubs, grass, or other obstacles hindering your construction.
You’ll want to dig down around 6 inches for a solid and safe foundation to create a hole for your fireplace base.
Keep the surface as level as possible to ensure the stability of your structure. After digging, fill it with a 2-inch thick layer of gravel for extra stability.
Tamper it down until it’s compact and provides a firm, even surface for the subsequent layer of concrete.
Step 3: Build the Fireplace Pad Form
Now, it’s time to build the foundation for your outdoor fireplace.
First, construct a wooden form for your concrete pad.
This pad will support the weight of the fireplace, so it needs to be sturdy and level. Measure and cut 2x4s to the desired dimensions of your fireplace, ensuring you’ve accounted for all sides.
Assemble the 2x4s into a box-like form, securing the corners with nails or screws. Next, position your form in the excavated area you’ve prepared.
Check the level and make any necessary adjustments.
Once satisfied, pour the concrete mix into the form until it’s complete, then smooth the surface with a trowel. Allow the concrete to cure for at least 48 hours before proceeding to the next step.
Step 4: Pour the Fireplace Pad Concrete
Once your form is ready and securely positioned, it’s time to pour the concrete.
Prepare the concrete mix following the manufacturer’s instructions.
Pour the mix into the form, filling it up to the top.
As you pour, use a shovel or a stick to push the concrete mix into the corners and against the form sides, ensuring no air pockets.
Once you have filled the form, screed the concrete with a 2×4, moving it back and forth across the form top to level the concrete and fill any low spots.
Then, use a trowel to smooth the surface. Allow the concrete pad to cure thoroughly, which typically takes 48 to 72 hours.
Remember, it’s crucial not to rush this process, as the strength and durability of your fireplace depend on a well-cured base.
Step 5: Let the Concrete Get Dry
Before moving on to the next step, ensure the concrete is dry.
The curing process is critical to the integrity of your fireplace foundation.
It typically takes 48 to 72 hours, but this can vary depending on the weather and mix.
During this period, it’s best to cover the pad with plastic or a tarp to prevent it from drying out too quickly, which can lead to cracks.
Once the concrete is fully cured, you can proceed to the next step of building your DIY outdoor fireplace.
Step 6: Lay the Fireplace Woodbox
The next step in your DIY outdoor fireplace project is constructing the fireplace wood box.
This part of the fireplace will house your logs and is where the fire will burn. Begin by laying out the first layer of concrete blocks.
Apply your high-heat mortar to the bottom of each block and place it onto the concrete pad, ensuring it’s level.
Continue this process, creating a rectangular shape that will form the base of your fireplace wood box.
Once you’ve completed the first layer, repeat the process by adding more blocks.
Remember to stagger the joints for added stability.
When you reach your desired height, allow the mortar to dry completely before moving on to the next step.
In the meantime, you may want to insert your fireplace grate to ensure it fits.
Step 7: Create the Lintel
The lintel is the horizontal structure above the fireplace opening, supporting and preventing the blocks from caving in.
To create your lintel, first measure the width of your fireplace opening.
Then, cut a piece of rebar to this measurement, plus an extra foot on each side.
Now, lay a line of blocks on each side of the opening and place the rebar on top of these blocks, allowing it to overhang equally on both sides.
Finally, secure the rebar with a layer of high-heat mortar and add another layer of blocks on top.
Ensure the blocks are level and allow the mortar to dry completely before proceeding to the next step.
Step 8: Lay the Hearth Blocks
The hearth is the fireplace floor where the fire burns, and its construction is crucial for safety and efficiency.
Begin by applying a layer of high-heat mortar on top of the dried lintel blocks.
Now, place your hearth blocks onto the mortar, starting from the back and working towards the front.
Press down each block firmly into the mortar to ensure a secure fit.
Also, pay close attention to the alignment of the blocks, ensuring they are level and straight.
If applicable, remember to leave a gap at the back of the hearth for the chimney flue.
Once all the hearth blocks are laid, allow the mortar to dry completely before moving on to the next step.
toward
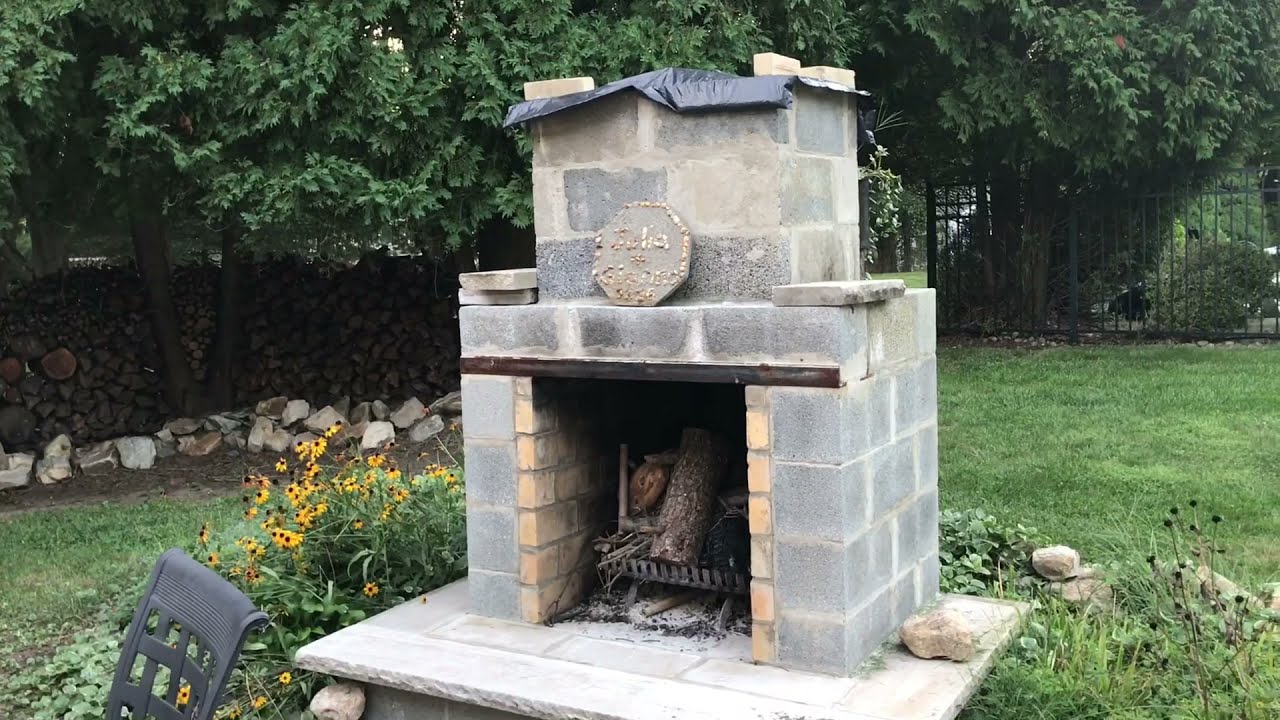
Step 9: Build the Firebox
The firebox is the interior part of the fireplace where the fire is built and contained.
To construct this, start by applying a layer of high-heat mortar on top of the hearth blocks.
Then, lay your firebox bricks on top of the mortar, beginning at the back and working toward the front.
Ensure each brick is firmly pressed into the mortar and aligned correctly.
The layout should resemble a “U” shape, open at the front where the fire will be visible.
Remember to leave a gap at the back for your chimney flue.
Stack the bricks up to your preferred height, but ensure it doesn’t exceed the height of your wood box.
Once you’ve completed this step, allow the mortar to dry completely before proceeding to the next step.
to set the caps in place firmly
Step 10: Add the Chimney Caps
Adding the chimney caps is the final step in building your DIY outdoor fireplace.
These components serve as a protective cover that prevents rain, snow, and debris from entering the chimney while allowing smoke and gases to exit.
To install the chimney caps, apply a layer of high-heat mortar on top of the last layer of bricks.
Position the chimney caps on the mortar, ensuring they are aligned with the chimney flue. Apply pressure to set the caps in place firmly.
Remember to check that the caps are level for proper smoke draw and water pooling prevention.
Once the chimney caps are securely positioned, allow the mortar to dry thoroughly. With the chimney caps, you have successfully built your outdoor fireplace.
Step 11: Lay the Veneer Stone
Applying the veneer stone is the final aesthetic touch to your DIY outdoor fireplace.
Veneer stone gives your fireplace a classic, elegant look and can be applied to match your outdoor decor. Start by selecting veneer stones of various sizes and shapes.
Mix up a batch of masonry adhesive according to the manufacturer’s instructions.
Apply a thick layer of adhesive to the back of each stone, and then press the stone firmly onto the surface of your fireplace.
Start from the bottom and work up, maintaining a staggered pattern to create a more natural look.
Use a masonry chisel to shape the stones as needed so they fit together snugly.
Allow the adhesive to dry completely, typically over 24 hours, before starting a fire in your new, beautiful outdoor fireplace.

FAQs
How far Should an Outdoor Fireplace be from the House?
For safety reasons and to adhere to most local building codes, an outdoor fireplace should be 10-20 feet away from any structure, including your house.
This distance helps to prevent accidental fires and minimizes heat damage to nearby structures.
However, always check with your local building or fire department for specific regulations in your area.
You should also consider prevailing wind patterns to prevent smoke from blowing into your home.
How much does it cost to build an outdoor fireplace DIY?
The cost of building a DIY outdoor fireplace can significantly vary depending on the materials used, the size of the fireplace, and whether you’re purchasing new or used materials. On the low end, a simple DIY fireplace could cost around $500 to $1,000.
This typically involves using less expensive materials and a smaller, more basic design.
The cost could rise to $2,000 to $5,000 or more for a more enormous, elaborate fireplace built with high-end materials.
These estimates do not include the value of your time or any tools you might need to buy or rent.
As with any DIY project, planning and budgeting carefully is essential to avoid unexpected costs.
Rounding Up
Building an outdoor fireplace is an excellent DIY project that enhances the aesthetic appeal of your outdoor space and offers functional benefits such as providing warmth and a place for outdoor cooking.
The process can be labor-intensive and requires careful planning and execution, but the result is undoubtedly rewarding.
Remember, safety should be your top priority during construction and operation. Always adhere to local building codes and maintain a safe distance from other structures.
With patience, attention to detail, and suitable materials, you can construct an outdoor fireplace that will be a focal point in your backyard for many years.