How to Build an Outdoor Gas Fireplace – Are you looking to make your backyard a cozy wonderland?
If so, have you ever considered adding an outdoor gas fireplace as the perfect centerpiece of your outdoor living space?
An outdoor gas fireplace can provide warmth and atmosphere for summer evenings with family and friends.
Building an outdoor gas fireplace can be done by anyone comfortable doing some basic construction tasks.
This blog post will guide you through each step, from planning to the finishing touches necessary for building a safe and visually pleasing outdoor gas fireplace. Read on to learn more.
What is An Outdoor Gas Fireplace?

An outdoor gas fireplace is essentially an outdoor fire pit that utilizes natural gas or propane as a fuel source.
Unlike traditional fireplaces that require wood logs, outdoor gas fireplaces offer a clean, smokeless flame while still providing the warmth and ambiance of a traditional fireplace.
They can come in various styles and designs, from rustic to modern, fitting seamlessly into any outdoor decor.
These fireplaces provide a focal point for any outdoor space, making it a cozy area for gatherings, and they also extend the use of your outdoor living space into cooler seasons.
How to Build an Outdoor Gas Fireplace

Materials Needed
Before beginning any construction, it’s essential to gather all necessary materials. Here’s what you’ll need:
- Concrete blocks
- Masonry adhesive
- Mortar mix
- Firebrick
- Fireplace doors
- Gas insert with logs
- Gas line kit
- Shovel
- Level
- Trowel
Step 1: Choose Your Location
Choosing the right location for your outdoor gas fireplace is paramount.
You need a site that offers enough space and is safe.
The fireplace and any flammable materials should be located at least 10 feet from your house.
Ensure the chosen spot is not directly beneath overhanging trees or near utility lines. Additionally, consider the direction of the wind and privacy.
You might not want the smoke blowing toward your house or the fireplace in direct view of your neighbors.
Last, consider your desired view and where the fireplace will look and function best within your outdoor space.
Step 2: Choose the Gas Type
Two primary gas options for your outdoor fireplace are natural gas and propane.
Natural gas is often the choice for stationary fireplaces, as it requires a fixed line to be installed.
It’s a cost-effective and efficient choice if you already have a natural gas line in your property.
On the other hand, propane is more portable and easier to install because it uses refillable tanks.
If your fireplace location is far from a natural gas line and mobility is essential, propane could be the better option.
Both gas types provide adequate heat and a pleasing flame, so your choice will depend on your specific needs and situation.
Step 3: Lay the Foundation
A solid foundation is crucial for the stability of your outdoor gas fireplace.
Start by marking the area where your fireplace will be.
Then, dig a hole about 6 inches deep.
This depth can be adjusted depending on the size of your fireplace, but the goal is to ensure a stable base.
After you’ve dug the hole, pour a layer of gravel about 3 inches deep and compact it.
Once the gravel is level, pour a concrete mix into the hole up to the ground level and smooth it with a trowel.
Give this foundation several days to cure completely before proceeding to the next step.
Step 3
Step 4: Build the Fireplace
Now, it’s time to erect the fireplace using your concrete blocks.
Start by applying a layer of masonry adhesive at the bottom of the first block before placing it on the concrete foundation.
Build the first block layer, ensuring each fits snugly with the next.
Use a level after laying each block to ensure your fireplace is even.
After completing the first layer, continue to the next one and stagger the blocks for additional strength.
Leave a space at the bottom for the gas line and an opening at the front for the fireplace doors.
The firebox area should be lined with firebricks to withstand the high temperatures.
Continue this process until you’ve reached the desired height for your fireplace.
Remember to leave a hole on one side of the structure for the gas line to go through.
Once the structure is complete, insert the gas line through the hole and connect it to your gas source, following the manufacturer’s instructions.

Step 5: Choose the Burner and Other Components
When selecting the burner for your outdoor gas fireplace, consider the size of your structure and the desired heat output.
There are various burner options, some designed to replicate the look of a traditional wood-burning fireplace and others that offer a more contemporary aesthetic.
In addition to the burner, you will also need to choose your fire media.
This can range from ceramic logs, which mimic the look of a traditional fireplace, to fire glass or lava rocks for a more modern feel.
Additionally, you might consider accessories such as a protective cover to shield your fireplace from the elements when not in use and safety barriers if children or pets will be around.
Installation of these components should be performed according to the manufacturer’s instructions.
Step 6: Install the Gas Insert and Logs
Installing the gas insert and logs is the final step in constructing your outdoor gas fireplace.
After ensuring your gas line is properly installed and functional, carefully insert the gas insert into the firebox area of the fireplace.
The gas insert should be compatible with your fireplace size and the type of gas used (natural or propane).
Once the gas insert is securely in place, arrange the gas logs on the insert.
These logs are designed to withstand high temperatures and provide the realistic look of burning wood.
Remember to follow the manufacturer’s instructions on positioning the logs for optimal performance and safety.
Once this step is done, attach and secure the fireplace doors and test your new outdoor gas fireplace.
You should see a beautiful and safe fire ready to provide warmth and ambiance to your outdoor space.
Step 7: Add the Finishing Touches
Finally, add aesthetic touches using your desired finishing materials.
This could be stucco, stone veneer, or paint.
Don’t forget to install the fireplace doors.
And there you have it! You have now built your outdoor gas fireplace.
Remember always to follow safety precautions when operating your new fireplace.
Now, sit back and enjoy the warmth and ambiance it offers.
FAQs
Can I Build a Gas Fireplace Myself?
Building a gas fireplace requires technical knowledge and skill, but it’s not impossible for a DIY enthusiast.
However, safety is paramount when dealing with gas and fire, so if you have any doubt about the process, it’s best to hire a professional.
Ensure you follow all instructions closely and adhere to local building codes and regulations.
Moreover, a certified professional should install the gas line to ensure safety and proper operation.
What material is used in a gas fireplace?
Depending on aesthetic preferences and safety considerations, gas fireplaces can be built from various materials.
The primary component, the firebox, is usually constructed from a high-temperature material like firebrick or refractory cement.
The exterior can be made from stone, brick, or heat-resistant metals for a more modern look.
The fireplace’s interior houses gas logs, typically ceramic, due to their ability to endure high temperatures, retain heat, and give off a realistic, glowing ember effect.
Finally, the burner, usually made from durable, rust-resistant stainless steel, is the heart of the gas fireplace, facilitating gas distribution to create a uniform, pleasing flame.
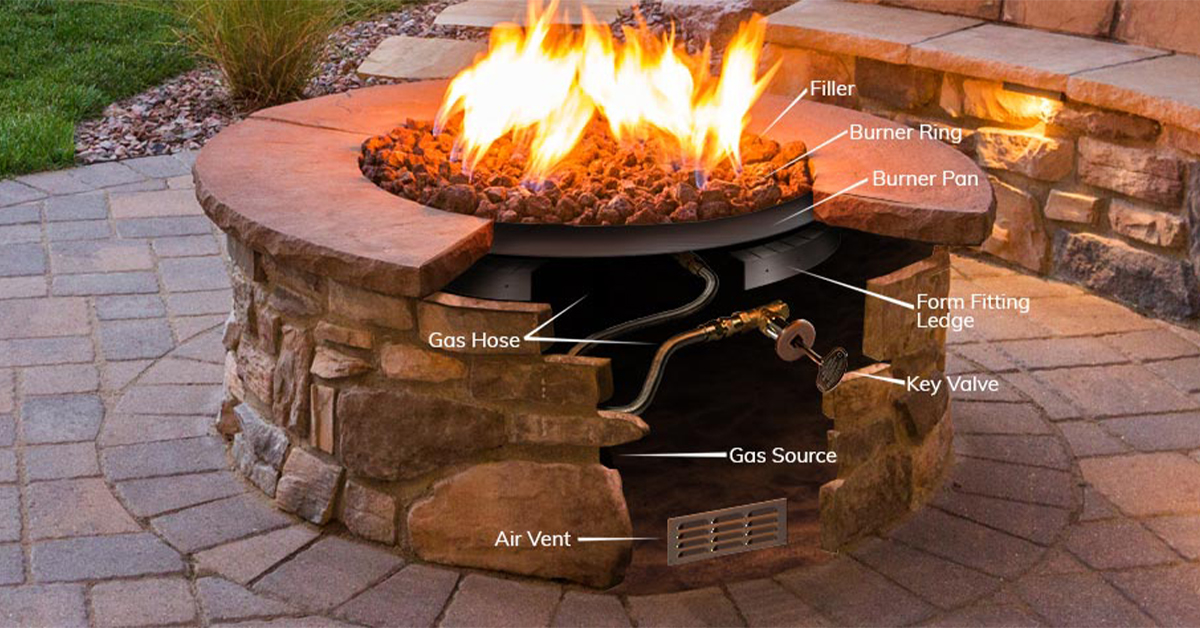
What are the components of an outdoor gas fireplace?
An outdoor gas fireplace has several vital components that allow it to operate efficiently and safely.
- Fireplace Structure: The structure is typically built from concrete blocks or bricks, designed to withstand outdoor elements and high temperatures.
- Firebox: Located inside the structure, the firebox is lined with heat-resistant materials such as firebricks. This is where the combustion process takes place.
- Gas Burner: This component disperses the gas evenly to create a uniform flame. The burner can be designed to mimic the look of a traditional wood fire or a modern aesthetic.
- Gas Insert: The gas insert contains the burner and the logs. It should match the size of your fireplace and be compatible with the type of gas used.
- Gas Logs: Made from ceramic, these logs withstand high temperatures and give off a realistic look of burning wood.
- Ventilation: Proper ventilation is crucial to ensure the gas is combusted entirely and to prevent the accumulation of harmful gases.
- Gas Line: The gas line connects the fireplace to the gas source. A certified professional should install it to ensure safety and proper operation.
- Accessories: These may include fireplace doors, a protective cover, or safety barriers, especially if children or pets will be around the fireplace.
Rounding Up – How to Build an Outdoor Gas Fireplace
Building an outdoor gas fireplace can be a rewarding DIY project, offering a cozy and engaging space to gather with friends and family.
With careful planning, suitable materials, and adherence to safety protocols, you can create a fireplace that enhances the aesthetic appeal of your outdoor area and increases your space’s functionality.
Whether you opt for a traditional or modern design, the warmth and ambiance provided by your outdoor gas fireplace will surely make it a cherished addition to your home.
Always remember that safety is paramount; seek professional advice or assistance if in doubt.